Pterodactyl Single Machine Guide
Published at 28. mai 2024
Single Machine Game servers with Docker and Pterodactyl
Game server hosting
I have hosted my fair share of game servers throughout the years. The first probably being minecraft or terraria using hamachi as a proxy because my dad would not allow me to port forward. Hosting a server has almost always been quite a headache to be honest. Setting it up on my own machine and having to have it on if people want to play when I am not there. dealing with corrupt world saves and missing characters and items. A pain in the bottom. Until I thought one day. “Why am I hosting these game servers like I am a 12 year old with no IT knowledge.” Its like I forgot that I actually do this for a living and have a BA and years of experience. Bad habits really do take their toll sometimes.
The setup
Once that idea had settled in my slightly denser than the average head I realized I have all the tools I need without having to invest in a lot of hardware. Trust me when I say this. Game servers (on my scale! 5 - 10 players max!) do not require major hardware investment. Sure you can throw some money at it to make it a bit smoother and to have more headroom. But for most people hosting 1 to 2 servers for their friend group, an old pc with a decent cpu and a good amount of ram is more than you need.
So I have a Dell Mini Pc laying around. With some form of i5 from 2015 ish👋. 4 Cores - 8 threads and 16gb of memory. Perfect. The only downside right now is the quite limiting 250gb ssd in it currently but that is very easily upgraded. This could be any old pc lying around, but this is what I have. the only thing I would recommend maybe upgrading is the memory. Getting up to at least 32gb is going to make everything easier especially if you plan on running multiple servers with active players at the same time. The ram does not have to be that fast, you just need a lot of it. For me this is actually quite cheap since sodim ddr3 32gb sets can be found online for like 40$ or cheaper if you are willing to risk buying used.
OS
When it comes to server OS I am not picky. I usually just go with Ubuntu server. This could really be anything. I am just familiar with Canonicals quirks and I know it to be stable enough without many breaking changes on the stable branch. Also I like apt… sue me!
Go with what you like, but go with something stable. These games break themselves often enough, you don’t need your OS doing the same.
Software stack
This is where paths diverge for a lot of people. But I can only give my opinion with my experience.
So looking at this from the use case of 2 - 4 servers for 2 - 10 players I chose not to go with kubernetes. It’s great for what it is but using a porche to deliver milk is not always the bes idea.
So I am using Docker managed mostly through portainer pulling docker compose files from my private repo. This is easy to set up and has the benefit of taking a really short time to redeploy. This could further be optimized with setting up a docker swarm and setting up dependencies but I have chosen not to to keep things simple.
Portainer A great tool for monitoring and administering your docker containers. It’s free for personal use although you will have to create an account and get a license key that is good for up to 3 nodes.
Traefik An easy to use reverse proxy that allows you to administer certificates to all of your sites and servers and makes that pesky self signed warning go away.
Pihole Pihole is a lot of things but for my use I mostly use it as my local DNS server.
Pterodactyl A great platform to setup and administer game servers used by large hosting services and small self hosters
You will also need a domain you own and I recommend using cloudflare for your domain. I have tried 2 before cloudflare and none of them had the same features and ease of use as cloudflare. #notAnAdIjustLikeCloudFlare
Now I am not going to go into every detail about every step of setting this up since that would make this guide/ramble way longer than it needs to be. I will rather be linking to great guides that I found extremely helpful when setting this all up. So follow CloudFlare’s excellent guide on setting up your domain with them. CloudFlare guide
Traefik
I am going to be glossing over some details here, but if you feel lost setting up Traefik I would highly recomend TechnoTim’s guide and video on setting up Traefik. TechnoTim Guide
If you follow this guide you should be able to setup a Traefik container that can distribute ssl certificates to your local services using Pihole as your DNS server serving nice clean cname records for your services like portainer.mydomain.tech or pihole.mydomain.tech.
Pterodactyl … not the intended use case
Now I have to say before we continue pterodactyl is not really meant to be used this way. Pterodactyl is meant to administer nodes that are often separate machines. It is used by a lot of games hosting companies and does a lot of things out of the box for you when installing games and administering a server or many servers.
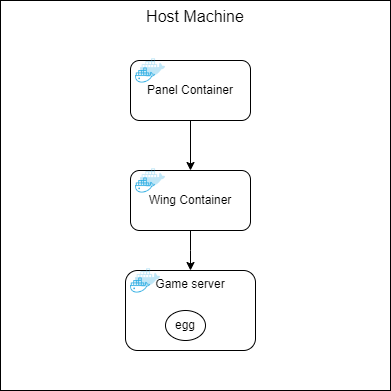
But we are going to be setting it up in a way that it can run and administer nodes or “wings” as they call them on the same machine.
Quick guide on the pterodactyl lingo.
- Panel: This is the main container that runs the pterodactyl admin panel.
- Wing: The service that allows you to interact with your game server directly.
- Node: A machine running your game server usually a physical server but in this case a container.
- Server: An instance running on your node. You can have multiple per node.
- Nest: A logical grouping of assets, usually a game. A nest can have many eggs.
- Egg: This is the configuration for a specific game for an example Minecraft, Forge Minecraft or Valheim to name a few.
- Yolk: A yolk is the collection of docker images that can used with the pterodactyl Egg system.
So since we are doing this the ‘wrong’ way our pterodactyl looks a bit different than the ‘normal’ setup.
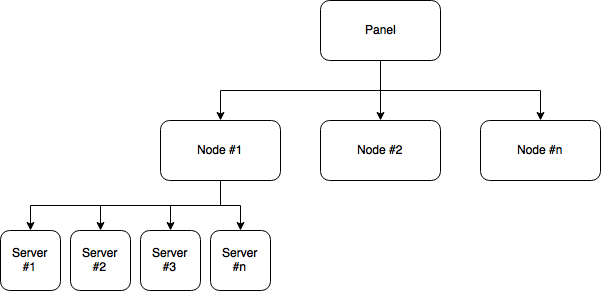
Instead of the normal setup witch looks a bit more like this:
Now someone might be thinking “Why are you doing this with software that was clearly not meant for this?“. Well because I only have 1 spare computer and I want to use pterodactyl to administrate my servers. It works well and I like it. I just have to finegle it a bit.
Now comes thee docker compose bit. There was a lot of trial and error involved in this so I will go over it bit by bit.
Below we have the standard setup for pterodactyl. DB password, panel url and mail stuff.
version: '3.8'
x-common:
  database: &db-environment
    # Do not remove the "&db-password" from the end of the line below, it is important
    # for Panel functionality.
    MYSQL_PASSWORD: &db-password 'SuperSecretAndTotallyGoodPassword'
    MYSQL_ROOT_PASSWORD: 'SuperSecretAndTotallyGoodPassword'
  panel: &panel-environment
    APP_URL: 'https://panel.mydomain.tech'
    # A list of valid timezones can be found here: http://php.net/manual/en/timezones.php
    APP_TIMEZONE: 'Europe/Amsterdam'
    APP_SERVICE_AUTHOR: 'myemail@mydomain.tech'
  mail: &mail-environment
    MAIL_FROM: 'noreply@example.com'
    MAIL_DRIVER: 'smtp'
    MAIL_HOST: 'mail'
    MAIL_PORT: '1025'
    MAIL_USERNAME: ''
    MAIL_PASSWORD: ''
    MAIL_ENCRYPTION: 'true'
Then we have the database container and the cache for pterodactyl. This is all standard. However take note that both containers are in a network called “pterodactyl”. I will come back to that later.
services:
  database:
    image: library/mysql:8.0
    restart: always
    networks:
      - pterodactyl
    command: --default-authentication-plugin=caching_sha2_password
    volumes:
      - "${DATA_DIR}/database:/var/lib/mysql"
    environment:
      <<: *db-environment
      MYSQL_DATABASE: "panel"
      MYSQL_USER: "pterodactyl"

  cache:
    image: redis:alpine
    restart: always
    networks:
      - pterodactyl
Next we have the Pterodactyl Panel. This is all standard from pterodactyl except for the network and the labels.
There are 2 networks here. Pterodactyl is the network we are going to set up at the bottom of this file so that all of our containers can talk to eachoter. The Proxy network is the network that Traefik is on and is needed for the Traefik service.
The labels are also kind of standard. Feel free to copy these or use the ones that work for you.
Note that there are no ports being exposed through docker here. Since we go through Traefik we don’t need the container itself to expose any ports directly. Also setting “TRUSTED_PROXIES” to ”*” saves a lot of headache. IDK exactly what this option does… but it makes your wings discoverable through Traefik so 👍
panel:
    image: ghcr.io/pterodactyl/panel:v1.9.1
    restart: always
    networks:
      - proxy
      - pterodactyl
    links:
      - database
      - cache
    volumes:
      - "/srv/pterodactyl/var/:/app/var/"
      - "/srv/pterodactyl/nginx/:/etc/nginx/http.d/"
      - "/srv/pterodactyl/certs/:/etc/letsencrypt/"
      - "/srv/pterodactyl/logs/:/app/storage/logs"
    environment:
      <<: [*panel-environment, *mail-environment]
      DB_PASSWORD: *db-password
      APP_ENV: "production"
      APP_ENVIRONMENT_ONLY: "false"
      CACHE_DRIVER: "redis"
      SESSION_DRIVER: "redis"
      QUEUE_DRIVER: "redis"
      REDIS_HOST: "cache"
      DB_HOST: "database"
      TRUSTED_PROXIES: "*"
    labels:
      - "traefik.enable=true"
      - "traefik.http.routers.panel.entrypoints=http"
      - "traefik.http.routers.panel.rule=Host(`panel.mydomain.tech`)"
      - "traefik.http.routers.panel.middlewares=default-whitelist@file"
      - "traefik.http.middlewares.panel-https-redirect.redirectscheme.scheme=https"
      - "traefik.http.routers.panel.middlewares=panel-https-redirect"
      - "traefik.http.routers.panel-secure.entrypoints=https"
      - "traefik.http.routers.panel-secure.rule=Host(`panel.mydomain.tech`)"
      - "traefik.http.routers.panel-secure.tls=true"
      - "traefik.http.routers.panel-secure.service=panel"
      - "traefik.http.services.panel.loadbalancer.server.port=80"
      - "traefik.docker.network=proxy"
      - "traefik.http.routers.panel-secure.tls.certresolver=letsencrypt"
Now we do the same with the wings container. This is much the same however here we have to not only add the pterodactyl and proxy network but also the wings own network. This is the network that the game servers for that wing will use.
Here we also have to expose port 2022 since that is the port the wings use to talk to the game servers and the servers do not use Traefik. (This could be added in the future so that each server has their own cname like ‘minecraft.mydomain.tech… but I could not be bothered. Maybe later.)
The volumes are mostly standard I just created a directory for the config file and the log that was easily accessable. This will be important later!
In the lables here we set the Traefik load balancer to 443 since the wings -> server trafic uses https. We also set the url of the wing to wing.mydomain.tech like we did for the panel with panel.mydomain.tech.
wings:
  image: ghcr.io/pterodactyl/wings:v1.11.0
  container_name: wings
  restart: always
  networks:
    - wings0
    - pterodactyl
    - proxy
  ports:
    - '2022:2022'
  tty: true
  environment:
    TZ: 'Europe/Amsterdam'
    WINGS_UID: 988
    WINGS_GID: 988
    WINGS_USERNAME: pterodactyl
  volumes:
    - /var/run/docker.sock:/var/run/docker.sock
    - /var/lib/docker/containers/:/var/lib/docker/containers/
    - /tmp/pterodactyl/:/tmp/pterodactyl/
    - /home/homeserver/Docker/pterodactyl/wings/config/:/etc/pterodactyl/
    - /home/homeserver/Docker/pterodactyl/wings/logs:/var/log/pterodactyl/
    - /home/homeserver/Docker/pterodactyl/wings/data:/data
    - /var/lib/pterodactyl/:/var/lib/pterodactyl/
  depends_on:
    - panel
  labels:
    - 'traefik.enable=true'
    - 'traefik.http.routers.wing.entrypoints=http'
    - 'traefik.http.routers.wing.rule=Host(`wing.mydomain.tech`)'
    - 'traefik.http.routers.wing.middlewares=default-whitelist@file'
    - 'traefik.http.middlewares.wing-https-redirect.redirectscheme.scheme=https'
    - 'traefik.http.routers.wing.middlewares=wing-https-redirect'
    - 'traefik.http.routers.wing-secure.entrypoints=https'
    - 'traefik.http.routers.wing-secure.rule=Host(`wing.mydomain.tech`)'
    - 'traefik.http.routers.wing-secure.tls=true'
    - 'traefik.http.routers.wing-secure.service=wing'
    - 'traefik.http.services.wing.loadbalancer.server.port=443'
    - 'traefik.docker.network=proxy'
    - 'traefik.http.routers.wing.tls.certresolver=letsencrypt'
Now for the last bit. The network.
Here we have to declare that the proxy network is external. You will have to create it seperately, and we have to create the pterodactyl and wings0 network.
Here you can play around with the address ranges if you want but I am fine with these 2 networks. We also have to add the driver_opts for the docker socket to the wings0 network.
networks:
  proxy:
    external: true
  pterodactyl:
    name: pterodactyl
    driver: bridge
    ipam:
      config:
        - subnet: '172.20.0.0/16'
  wings0:
    name: wings0
    driver: bridge
    ipam:
      config:
        - subnet: '172.21.0.0/16'
    driver_opts:
      com.docker.network.bridge.name: wings0
That is the whole thing. It maybe not that impressive but it took a while to get the network right and a bit more time than I would like to admit to figure out what containers should be in what networks.
Dependencies
Just to go over what is needed for this to be deployed the way I do it.
- Host with portainer set up on it. (Not really needed but I a nice to have)
- Pihole container set up on host with the needed cname’s
- Traefik container set up with correct DNS config that can assign ssl certificates
Once all of that is up we should be able to spin up this docker compose file without errors. The wings container will spit out a bunch of warnings in the log but that is because we have not set up the config file for it yet.
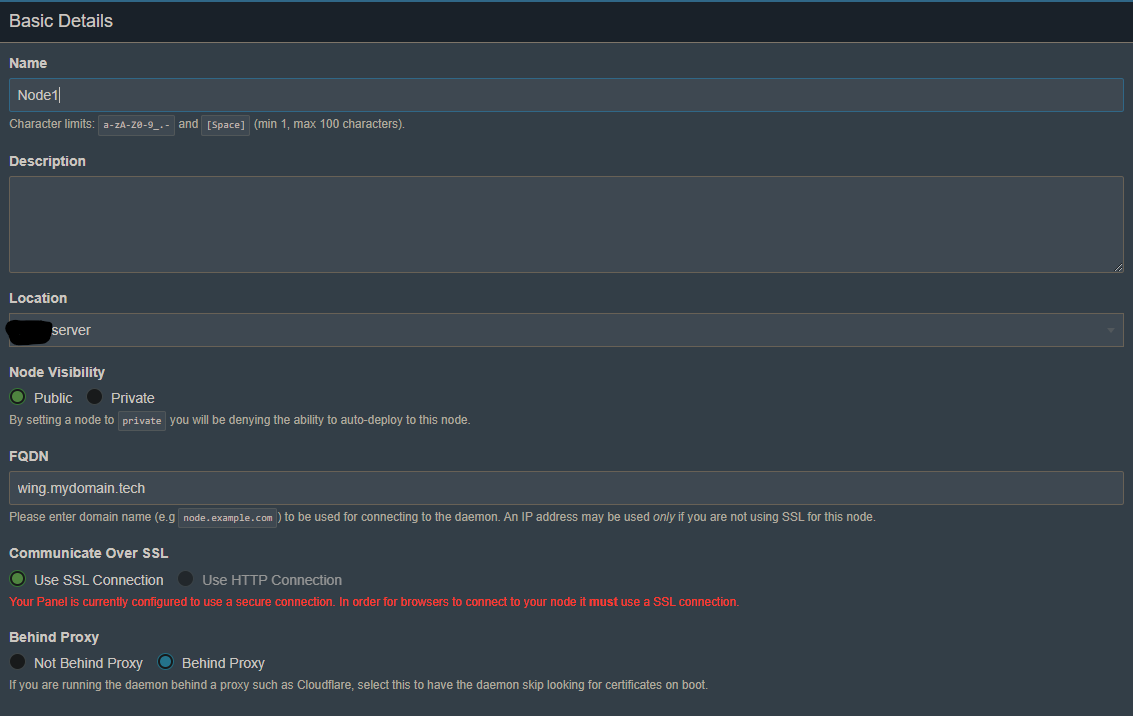
By now your panel should be up at panel.mydomain.tech. Now you need to open it up and add your node. That node will be the same as your wing. I know its confusing, But stick with me.
Below you can see what you need to set up your node. Your FQDN will be the same as you set up in your Traefik labels for the wings container so in this case wing.mydomain.tech. Also remember to select behind proxy. Otherwise nothing will work. Then you just setup your memory and disc allocation. And the last thing you need to do is set your daemon port to 443! By default it is 8080 but we need it to be 443 since we are going over https.
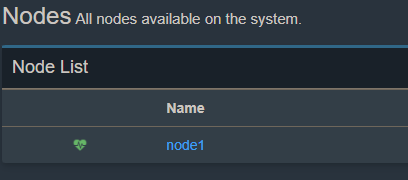
Once that is applied you can go to the node tab on the sidebar and see if you get the green heart of happiness or the read heart of despair. And don’t worry if you get the read one. Most likely you have done the same as me for 3 day’s. Added the wrong container to the wrong network or misspelled something. Check the setup again and redeploy.
Once that is done you can go into your node and grab your config from your config tab. Paste it into the wings config file located in my case at
- /home/homeserver/Docker/pterodactyl/wings/config/:/etc/pterodactyl/Then restart your wings container. This will generate the rest of the config needed and you should have a working Node with the wing setup correctly. Now you can start playing around with setting up game servers with pterodactyl behind Traefik on a single machine.
Niche theme, maybe. But there could be one other person searching frantically for the answer to this exact problem. And if so. Hello, hope this helps👌